

Here's how to make single welt pockets with no hand sewing. This tutorial is specifically written for Katy and Laney's Tap Shorts sewing pattern [update: this sewing pattern is no longer available] but can be adapted for any single welt pocket. Can't wait to see all of your to-be-made single welt pockets!

Things you need to make a single welt pocket
- Welt pattern piece (paper).
- The part of your garment where you want the welt pocket. For this tutorial it's #3 Shorts Back (blue piece).
- Cut out and fused (interfaced) welt (yellow piece), welt facing (pink piece), and pocket lining or bag (brown floral piece). All preassembled.
- A ruler.
- A marking tool. I'm using a pen as this is a sample, but you will want to use chalk or a water soluble pen.
Table of Contents
#1. Mark your welt pattern piece
#2. Mark the welt placement on your garment
#3. Cut your welt piece into 2 pieces
#4. Sew the welt to the garment
#6. Push the welt through the opening
#8. Sew the welt to the welt facing
#9. Sew down the little triangles
#1. Mark your welt pattern piece

Start by taking your welt pattern piece (paper) and draw a line through both the horizontal and vertical centers of the welt opening. Once finished, fold the pattern piece down along the bottom line of the welt opening.
#2. Mark the welt placement on your garment

Take the folded pattern piece (paper) and place it directly below the dart apex on your garment. (Reminder, this tutorial is specifically for Katy and Laney's Tap Shorts pattern, and according to their pattern, the welt goes over the very bottom of the dart. If your garment doesn't have a dart, follow your pattern's guide to placing the welt.) Using a ruler, ensure the vertical center line on your welt pattern piece (paper) is a continuous line following the dart. This ensures your welt will be square to the dart. While holding the pattern piece firmly in place, unfold the pattern piece and refold it along the horizontal center line drawn from step #1. Use the fold of the paper to mark the center of your welt opening by drawing a straight line from edge to edge.

Using the pattern piece again, transfer left and right edges of the welt onto your garment. Make a small mark indicating the points, then take a ruler and draw in lines perpendicular to the center-welt line already drawn.
#3. Cut your welt piece into 2 pieces

Using your welt pattern piece (paper), mark the center of the welt opening on your welt (yellow piece). Transfer the left and right edges of the welt as well the same way you did in step #2. It's best to do this before you cut the piece apart. Cut the welt into 2 pieces along the center-welt line.
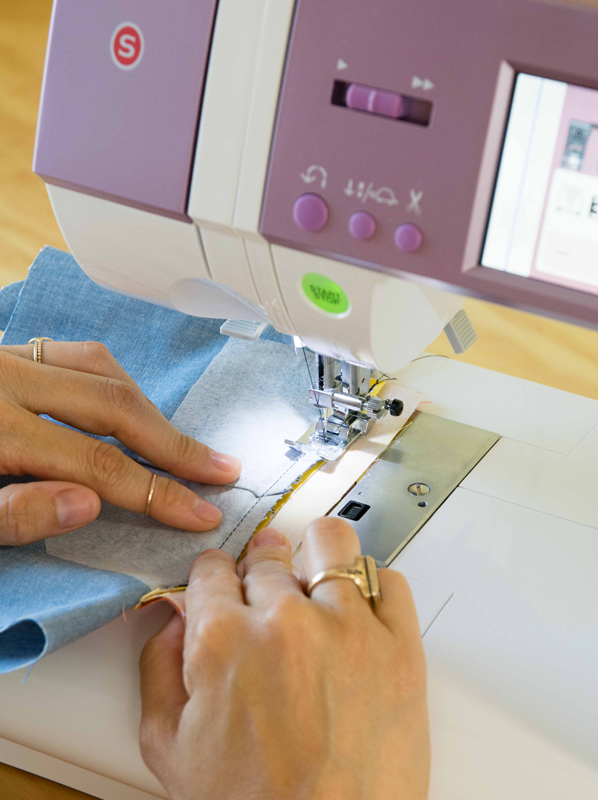
#4. Sew the welt to the garment

The photo above is just to illustrate how the welt will be sewn onto the garment. With right sides together, you will line up the welt pieces (yellow pieces) to match the markings on your garment (blue piece).
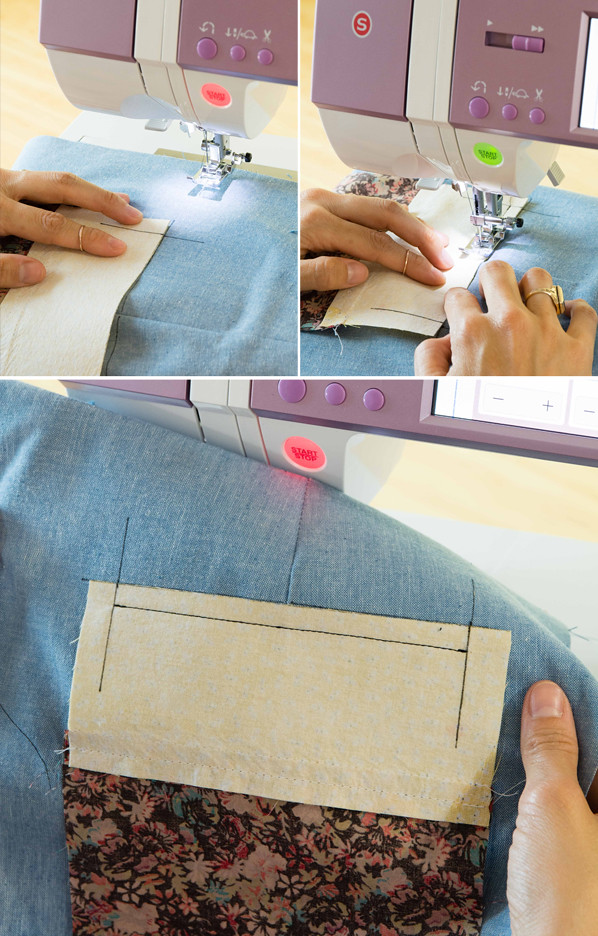
Start by sewing the half of the welt with the pocket lining attached (the yellow piece with the brown and pink pieces attached). Match the cut line of the welt (yellow piece) with the center-welt line drawn on the garment. Be sure to also align the left and right markings of the welt. Katy and Laney's welt opening is 1/2" wide, so sew the welt to the garment 1/4" from the center-welt line. Be sure to start and stop directly on the perpendicular markings.

Next, sew the top half of the welt (the little yellow piece) to the garment in the same way.

When you're finished, your garment should look like this. The top photo is of the right side of the garment. The photo below it is of the wrong side of the garment. If you've aligned everything correctly, the bottom seam line should pass right through the dart apex. If your seam line goes below the dart apex, that's OK too, but you don't want it to be above because then you will see the bottom of the dart from the right side of the garment.
#5. Cut the welt opening open
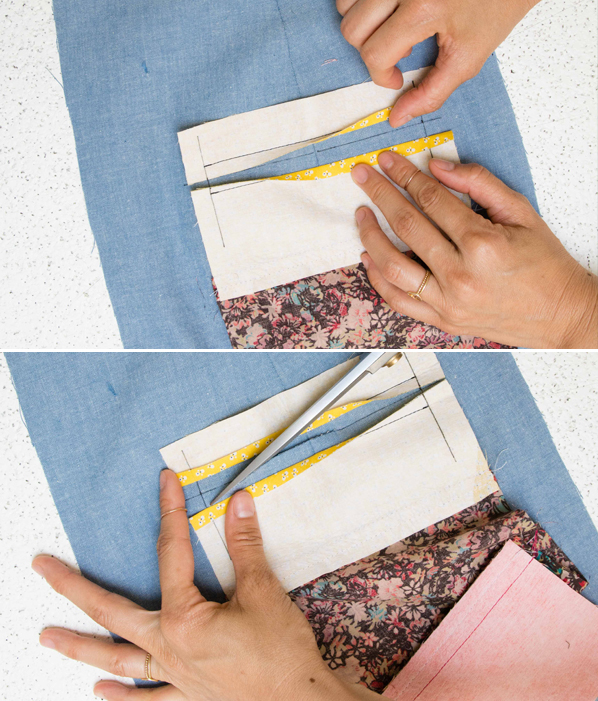
From the right side of the garment, push back the seam allowances of the welt (yellow pieces), and cut along the center-welt line marked on the garment itself (blue piece). An inch or so from the left and right ends of the welt opening, cut diagonally to the corners of the welt opening, snipping right up to the last stitch (but of course not through it). You should err on the side of longer diagonal lines that shorter.
#6. Push the welt through the opening
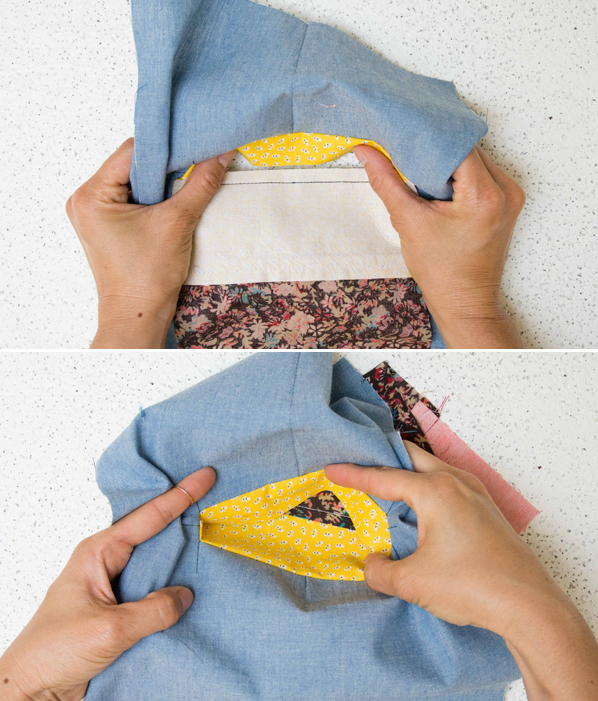
Just jam it right on through! Yellow, brown floral, and pink pieces.
#7. Make it all look pretty
From the wrong side of the garment, fold back the top of the welt (small yellow piece) so it's just to the inside of the welt opening. Press to set this piece in place. Next, push back the little triangles of the garment (blue piece) as well and press. From the right side of the garment, fold the bottom of the welt (the yellow piece with the brown and pink pieces attached) so it fits right into the welt opening. Once you've got it just right, press everything into place.
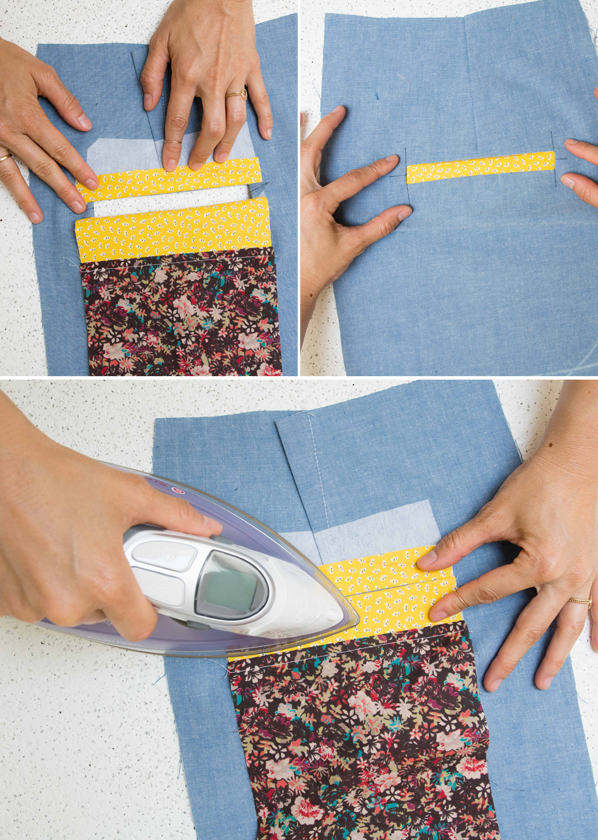
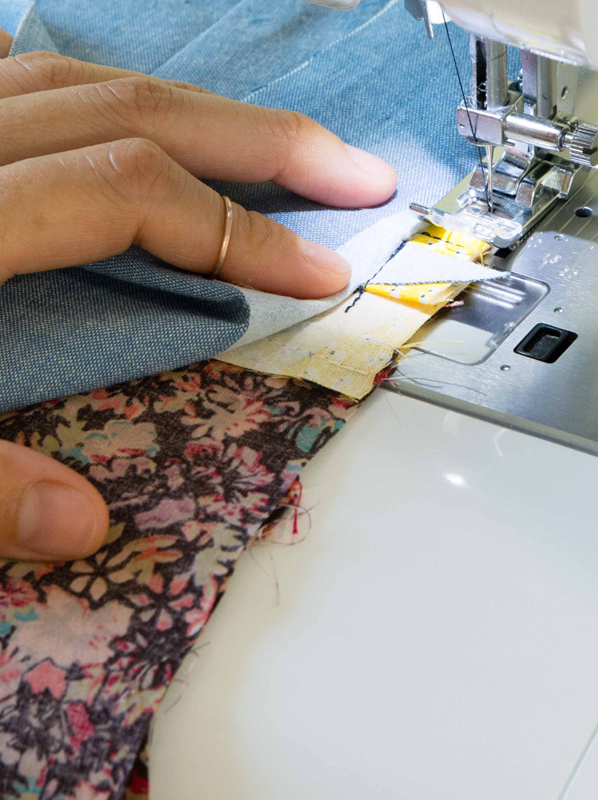
#8. Sew the welt to the welt facing

After you've pressed everything all nice and flat, take the welt facing (pink piece) and fold it over to match it up with the top of the welt (small yellow piece). Your pocket bag should now be folded in half, right sides together. Pick up the garment and push everything away except for the seam allowances of 1) the welt (little yellow piece), 2) the welt facing (pink piece), and 3) the garment (blue piece-remember it is also attached to the little yellow piece). When you go to sew, you should be sewing through 4 layers of fabric.
Sew all seam allowances together to the right of the seam that joins the top of the welt (little yellow piece) to the garment (blue piece). Sew all the way from raw edge to raw edge.
#9. Sew down the little triangles

Like we did in step #8, grab only the seam allowances of 1) the welt (this time you'll have both the top and bottom of the yellow piece), 2) the welt facing (pink piece), and 3) the little triangles on the garment (blue piece). Sew right along the crease at the base of each triangle on both the left and right sides of the welt.
#10. Sew the sides of the pocket bag together
Sew straight down the left and right sides of the pocket bag from top to bottom. Near the top you'll sew through the welt and welt facing pieces to the outside of the little blue triangles. Continue this seam all the way down the pocket bag.
#10. Do a happy dance!

Give the whole thing one last press, pat yourself on the back, and do a happy dance because you just made yourself a single welt pocket! Got any welt pocket tips of your own? Share them with us in the comments below! And, if you make a welt pocket using this tutorial, I'd love to see! You can tag me on social media (@workroomsocial) or leave a comment below.
Hi Anna! Thanks for your question! The top welt piece that is made when you cut the welt in half (the top yellow piece) is needed to finish the edges of the hole you’re cutting and to give you something to sew the facing onto.
What is the top welt piece good for ? Just to stabilize because it’s interfaced and the facing isn’t ?
I love your tutorial! It is everything I needed.
You’re such a great teacher. Thank you.
Do you think this can be tweaked to add a pocket to a fake welt seam?
Leave a comment